After selecting quality seedlings and preparing your land properly in part 1, the next critical phase in pixie orange farming is establishing your orchard through proper planting techniques and maintaining it with optimal irrigation, fertilisation, and pruning practices.
This second part of our comprehensive guide takes you through the essential steps of planting your pixie trees correctly, managing water and nutrients throughout the growing seasons, and pruning techniques that will shape your trees for maximum productivity.
Getting these fundamentals right from the beginning will determine whether you achieve the profitable yields of KSh 80-150 per kg or join the majority of farmers who struggle with low production.
Table of Contents
How to Plant Pixies in Kenya
Best Planting Time
The ideal time to plant pixies in Kenya is:
- Long rains: March-May (IDEAL)
- Short rains: October-November (GOOD)
- With irrigation: You can plant any time, but avoid extreme dry/hot periods
Step-by-Step Planting Procedure
1. Pre-Planting Preparation (1 day before)
- Water seedlings thoroughly
- Water planting holes (20 liters per hole)
2. Remove Seedling from Container
- Water bag/container first
- Cut the bag vertically; don’t tear the roots
- Keep the soil ball intact around the roots
3. Place the seedling in Hole
- CRITICAL: Ensure graft union is 20-30 cm ABOVE soil level (Very important)
- Position the tree straight and upright
- Orient the tree to face the prevailing wind direction
4. Fill Hole
- Use prepared soil mixture (topsoil with 2 buckets of well-decomposed manure)
- Fill gently, firming soil around roots
- Avoid air pockets
- Create small basin around the tree for water retention
5. Initial Watering
- Apply 20-30 litres of water immediately
- Water should settle the soil without causing runoff
6. Mulching
- Apply organic mulch (grass, crop residue, wood chips)
- Thickness: 5-10 cm
- Radius: 60-80 cm around the tree
- Keep mulch 15 cm away from the stem to prevent collar rot
7. Staking (if necessary, in windy areas)
- Use a wooden stake (1.5 meters tall)
- Drive 30 cm into the ground, 20 cm from the tree
- Tie the tree loosely with soft material (cloth strips, not wire)
- Remove stake after 6-12 months
Intercropping Options
Recommended Intercrop Crops
You can intercrop with short-duration crops to generate income during pre-productive years (years 1-3):
- Legumes
- Beans
- Cowpeas
- Green grams
- Tomatoes
- Kales
- Spinach
Crops to Avoid
Do NOT intercrop with:
- Maize
- Sorghum
- Melons
- Pumpkins
- Napier grass
Irrigation and Water Management
Water Requirements
Pixies need approximately 50-60 liters per tree per week, especially during:
- Flowering period
- Fruit development period
Irrigation Methods
Basin and flood irrigation has proved to be ideal compared to drip and overhead irrigation.
Critical Warning
Poor irrigation and water stress can cause:
- Fruit abortion
- Flower abortion
- Reduced yields
- Poor fruit quality
Key Point: Consistent moisture is essential for profitable pixie production.
Fertilization and Nutrition Management
Year 1 Fertilizer Application Program
Option 1: Compound Fertilizers
Products and Quantities:
- NPK 17-17-17 (balanced): 50-80 g per tree per application
- DAP (18-46-0): 40-60 g per tree per application
- CAN (Calcium Ammonium Nitrate, 26% N): 30-50 g per tree per application
Application Schedule:
- Month 1: 50 g NPK 17-17-17
- Month 3: 50 g DAP + 30 g CAN
- Month 6: 60 g NPK 17-17-17
- Month 9: 60 g DAP + 40 g CAN
- Month 12: 80 g NPK 17-17-17
Manure Application: Manure application is a must: 10-15 kg well-rotted manure per tree, applied 2-3 times per year.
Year 2 (Vegetative Growth Phase)
Goal: Vigorous canopy development
Recommended Program:
- February: 100 g NPK 17-17-17 or NPK 20-10-10
- April: 80 g DAP + 40 g CAN
- June: 120 g NPK 17-17-17
- August: 100 g DAP + 50 g CAN
- October: 150 g NPK 17-17-17
- December: 100 g DAP + 50 g CAN
Plus: 15-20 kg well-rotted manure or compost once or twice per year
Year 3 (Pre-Bearing to Early Bearing)
Goal: Transition to flowering and fruiting
Recommended Program:
- February (Pre-flowering): 150 g NPK 10-20-20 (boost phosphorus for flowering)
- April (After fruit set): 100 g NPK 17-17-17 + 50 g CAN
- June (Fruit development): 200 g NPK 20-10-20 (higher potassium for fruit quality)
- August: 150 g NPK 17-17-17 + 60 g CAN
- October: 200 g NPK 20-10-20
- December: 150 g NPK 17-17-17 + 60 g CAN
Plus: 20-25 kg well-rotted manure or compost twice per year
Year 4+ (Full Bearing/Mature Trees)
Goal: Maximise yield and fruit quality
Recommended Program:
- January (post-harvest rest): 200 g NPK 17-17-17 + 20 kg manure
- March (Pre-flowering): 250 g NPK 10-30-20 (high phosphorus for flower induction)
- May (After fruit set): 200 g NPK 17-17-17 + 100 g CAN
- July (Fruit development – CRITICAL): 300 g NPK 20-10-20 (high potassium for fruit sweetness and size)
- September (Pre-harvest): 200 g NPK 17-17-17 + 80 g CAN
- November (post-harvest recovery): 250 g NPK 20-10-20
Plus: 30-40 kg well-rotted manure or compost twice per year (January and July)
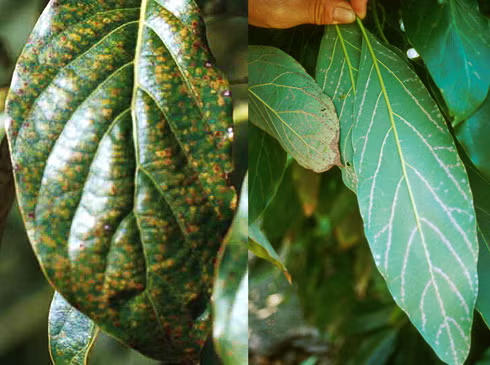
Common Nutrient Deficiency Symptoms and Corrections
| Nutrient | Deficiency Symptoms | Correction | Product & Dosage |
| Zinc (Zn) | Small leaves, interveinal chlorosis, resetting | Foliar spray | Zinc sulfate (0.3-0.5%) or Greenlife Multimicro Zn (20 ml/20 L water) |
| Iron (Fe) | Interveinal chlorosis on young leaves | Foliar spray or soil application | Ferrous sulfate foliar (0.5%) or chelated iron soil drench |
| Manganese (Mn) | Interveinal chlorosis, light green young leaves | Foliar spray | Manganese sulfate (0.3%) |
| Boron (B) | Thickened leaves, gum pockets in fruit, poor fruit set | Foliar spray | Borax (0.1-0.2%) or Solubor (50 g/20 L water) |
| Copper (Cu) | Dieback of shoots, large dark green leaves | Foliar spray | Copper sulfate (0.3%) or copper oxychloride |
| Magnesium (Mg) | Inverted V-shaped yellowing on older leaves | Foliar or soil application | Epsom salts (magnesium sulfate) 100-150 g/tree or foliar (1%) |
Micronutrient Spray Schedule
- Apply during vegetative flush periods (after flowering, after harvest)
- Frequency: 2-4 times per year
- Avoid: Spraying during flowering or hot midday sun
Fertilizer Application Methods
Method 1: Broadcasting (Most Common)
- Spread fertilizer evenly in a circle around the tree
- Radius: 0.5-1.5 meters from trunk (depending on tree age/size)
- Keep fertilizer at least 15-20 cm away from the trunk
- Lightly incorporate into soil (5-10 cm deep) with a hoe or rake
- Water immediately after application (very important)
Method 2: Banding
- Create 2-4 shallow furrows (10 cm deep) around the tree at the canopy drip line
- Apply fertilizer in furrows
- Cover with soil
- Water thoroughly
Foliar Feeding Application Guidelines
- Timing: Early morning (6-9 AM) or late afternoon (4-6 PM)
- Weather: Avoid rain within 6 hours; avoid windy days
- Application: Spray until runoff (leaves should be dripping)
- Frequency: Every 2-4 weeks during active growth
Pruning and Tree Management
Importance of Pruning
Benefits:
- Shapes the tree for easier harvesting
- Increases light penetration and air circulation
- Removes diseased, dead, or damaged wood
- Stimulates new productive growth
- Improves fruit size and quality
- Reduces pest and disease pressure
- Manages tree height
Types of Pruning
1. Formative/Training Pruning (Years 1-3)
Goal: Develop a strong tree structure with well-spaced scaffold branches
Year 1 (3-6 months after planting)
- Select 3-4 strong branches as primary scaffolds
- Branches should be evenly spaced around the trunk (120° apart if 3 branches)
- First scaffold branch: 40-50 cm above graft union
- Spacing between scaffold branches: 15-20 cm vertically
- Remove all other shoots/branches below the first scaffold
- Remove any shoots growing from the rootstock (below the graft union)
Year 2
- Select secondary branches on each primary scaffold
- Maintain an open centre or modified leader shape
- Remove inward-growing branches
- Remove crossing branches
- Tip prune vigorous shoots to encourage branching (remove 5-10 cm of tip)
Year 3
- Continue shaping
- Maintain tree height at 2.5-3 meters
- Remove water sprouts (vigorous vertical shoots) and suckers
2. Maintenance Pruning (Year 4+)
Goal: Maintain productivity, tree health, and manageable size
When to Prune: Immediately after harvest (October-December), before new flush
What to Remove (The “4 D’s” + Extras)
- Dead wood: Brown, brittle, no green under bark
- Diseased wood: Cankers, gumming, discoloration
- Damaged wood: Broken, split, or wounded branches
- Dying wood: Wilting, poor vigor
Plus:
- Crossing/rubbing branches
- Inward-growing branches
- Water sprouts (vigorous upright shoots)
- Suckers (shoots from rootstock or base)
- Branches touching ground
- Overcrowded canopy areas
Height Management
- Keep trees at 2.5-3 meters for easy harvesting
- Top vigorous trees if exceeding 3.5 meters
Thinning vs. Heading Cuts
- Thinning: Remove entire branch back to parent branch or trunk (preferred for citrus)
- Heading: Cut branch partway back to stimulate branching (use sparingly)
3. Rejuvenation Pruning (Old/Neglected Trees)
When: Trees over 15-20 years old with declining productivity
Method: Severe pruning over 2-3 years (don’t do all at once – too much shock)
- Year 1: Remove 30-40% of canopy (dead, diseased, crossing branches)
- Year 2: Remove another 30-40%, shape the tree
- Year 3: Final shaping and thinning
Aftercare: Heavy fertilization and irrigation to support regrowth
Pruning Tools and Techniques
Essential Tools
- Hand pruners/secateurs: For branches <2 cm diameter (KSh 800-2,000)
- Loppers: For branches 2-4 cm diameter (KSh 1,500-3,500)
- Pruning saw: For branches >4 cm diameter (KSh 1,200-3,000)
- Pole pruner: For high branches (KSh 2,500-6,000)
- Ladder: Stable, 2-3 meters (KSh 4,000-8,000)
Tool Maintenance
Sharpening
After every 5-10 trees or when cuts become ragged
Disinfection
Between trees to prevent disease spread
Disinfectant Options:
- 70% ethanol/rubbing alcohol
- 10% bleach solution (1 part bleach: 9 parts water)
- Commercial disinfectants (e.g., Virkon S)
Method: Dip or spray cutting blades, allow 30 seconds contact time
Pruning Techniques
1. Proper Cut Angle
- Cut at a 45° angle just above the outward-facing bud (for heading cuts)
- For thinning cuts, cut flush with parent branch collar (don’t leave stub, don’t cut into collar)
2. Removing Large Branches (Three-Cut Method)
- Cut 1: Undercut 30 cm from the final cut point (prevents bark tearing)
- Cut 2: Top cut 35 cm from the final point (removes branch weight)
- Cut 3: Final clean cut at the branch collar
3. Wound Treatment
- Small cuts (<2 cm): No treatment needed
- Large cuts (>5 cm): Apply wound sealant/paint to prevent disease entry
- Products: Copper-based wound dressing, Lac Balsam, or latex paint
Seasonal Pruning Calendar
| Month | Pruning Activity | Purpose |
| January | Light removal of dead/diseased wood | Post-harvest cleanup |
| February-March | Major structural pruning | After harvest, before flowering |
| April-August | Minimal (fruit development period) | Avoid disturbing fruiting |
| September-November | Sucker/water sprout removal only | Minimize stress during maturation |
| December | Remove diseased wood, prepare for harvest | Disease management |
Common Pruning Mistakes to Avoid
- Over-pruning: Removing >30% of canopy in one session (causes stress, reduces yield)
- Pruning during flowering/fruiting: Reduces yield
- Leaving stubs: Invites disease, doesn’t heal properly
- Cutting into branch collar: Inhibits healing
- Using dull tools: Causes ragged cuts, disease entry points
- Not disinfecting tools: Spreads diseases between trees
- Pruning diseased trees first: Cross-contamination risk (prune healthy trees first)
- Removing too many fruiting branches: Reduces current year yield
Coming Next: Part 3 will cover comprehensive pest and disease management strategies, harvesting techniques for optimal quality, and post-harvest handling to maximize your profits from pixie orange farming.
)